In this article, I will go over some tools to hgelp you build production grade Python applications. From debuggin tools such as pdb, 12 factor compliant logging, tersting using pytest and UnitTest, virtualization using virtualenv and auto generation of documentation using Sphinx, this article will walk you through the basics to understand and use these tools to improve your nect Python project.
Debugging
There are two Python libraries I want to go over for debugging: pdb and pudb. pdb provides stack and parameter information. Using pdb.set_trace() enables the command line debugger allowing you to control the code execution from the command line. A few commands are w for printing the current stack trace, d to move the current frame count down, u to move it up, s to execute the current frame, and r to continue execution until the current function returns. You can view details on these commands and a few others here. ipdb also gives the same functionality as pdb but can also be used in IPython.
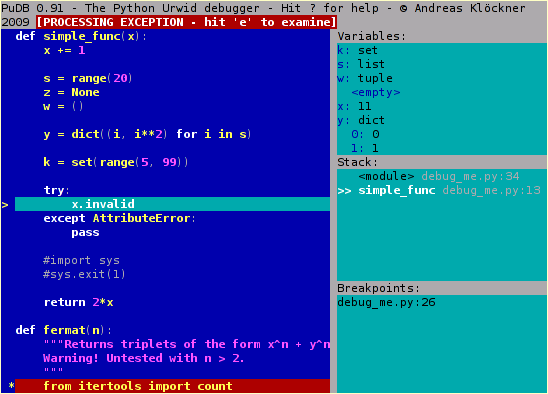
pudb is a more feature rich visual based debugger on the console. pudb allows you to debug the code when you are writing it unlike pdb. Start pudb by running the script with pudb my-script.py. You can also import pudb then run set_trace() likepdb. You’ll be presented with a GUI interface with information such as the current variables, and breakpoints, and current stack trace. You can also run a remote debugger with from pudb.remote import set_trace and call set_trace(set_term=(80,24)). View more about pudb here.
Logging
The logging library gives you production level logging capabilities. When you execute a Python script, the __name__ variable gets set to __main__. This is largely used to run different code based on if a file is loaded as a module or ran as a script. We can also use this variable to create a global logger object throughout the application and we do that with:
import logging
_LOGGER = logging.getLogger(__name__)
The _LOGGER object will be the same logging object with the same configuration settings anywhere you use this getLogger with the __name__ variable. Of course you can have multiple logger objects if you wish. With the logger object you can set handlers, which handle the output of the logging (default to stdout), formatters, which format the string that will passed to the handlers, and root settings such as logging level. The logging level is a numeric value between 0-100 and some defaults are provided below. We can set the current default logging level with the setLevel method. We can then check if a logging level is enabled with isEnabledFor(level). The important thing to remember is a logging levle means any logs at that level and above will log to the handlers, any logging level below that set level will not.
- CRITICAL (50)
- ERROR (40)
- WARNING (30)
- INFO (20)
- DEBUG (10)
- NOTSET (0)
We can then log different logging levels with debug, info, warning, error, critical, log (logs with integer level), and exception (logs on error level) methods. Handlers allow you to create custom ways the logger messages can be logged. The Handler is a base class of other built in handlers such as StreamHandler, FileHandler, SMTPHandler, and HTTPHandler. Formatters allow you to format the output of a log. You can specify different formats for each section of the log such as formatTime which formats the log time with time.strftime() . The default time format is %Y-%m-%d %H:%M:%S, uuu. formatExecption allow you to format the specific exception being logged and formatStack allows you to custom the stack trace being logged. Putting some of this together a logger configuration might look like below. You can also use a logger configuration file .
import logging
from logging.config import dictConfig

logging_config = dict(
  version=1,
  formatters={
    'f': {
      'format': '%(asctime)s %(name)-12s %(levelname)-8s %(message)s'
    }
  },
  handlers={
    'h': {
      'class': 'logging.StreamHandler',
      'formatter': 'f',
      'level': logging.DEBUG
    }
  },
  root={
    'handlers': ['h'],
    'level': logging.DEBUG,
  },
)

dictConfig(logging_config)
logger = logging.getLogger()

logger.debug("Debug type logging")

# add stack trace as part of logging
try:
  9/0
except Exception as e:
  logging.error('Exception', exc_info=True)


# or use a configuration file
logging.config.fileConfig(fname='logging.conf', disable_existing_loggers=False)
The logging library can be helpful to log metrics in production. Metrics such as number of errors, how many users logged in, and response time of APIs can be invaluable to improving your codebase. There are a few dedicated metics Python libraries out there such as New Relic and Datadog that wrap the logging library to help you with data collection.
Testing
Pytest and UnitTest are the most popular librariues used for testing. UnitTest is the built in library for Python but Pytest can be more flexible and is my go to for testing. To use UnitTest, we will need to create a class that inherits from TestCase. This TestCase class gives our class testing methods as assertEqual and assertTrue. You can view all of the methods provided here. Notice that each t est method begins with test_.
from unittest import TestCase

class SimpleTest(TestCase):
  def test_simple(self):
    self.assertTrue(True)

  def test_tuple(self):
    self.assertEqual((1, 3, 4), (1, 3, 4))

  def test_str(self):
    self.assertEqual('This is unit test', 'this is')
Sometimes you may need to do somethjing before and/or after each test and UnitTest provides setUp and tearDown method hooks for this. Just declare these methods on your testing class and they wil automatically run before and after each test method. Read more about how UnitTest works at the official Python documentation.
Pytest on the other hand can use classes like UnitTest but it can be easier and cleaner to just write functions. Pytest gives you a built in assert whe importing. The functions here also begin with test_.
import pytest

def test_simple():
  assert 2 == 2

def not_equal():
  assert 2 != 2

def assert_false():
  x = 0
  assert x is 0

def assert_in():
  assert 5 in [1, 3, 8, 5]
Even though Pytest only gives you assert, yuou can do everything that UnitTest can do which in my opinion makes thigs a bit cleaner. Instead of setUp and tearDown mothods, Pytest uses fixture decorator. You will define a function as a fixture then use the function name as an argument to your test function. Pytest will automatrically run that ficture function and the return values is what gets passed down as an argument to your test function. In this example, smtp_connection is the fixture function and the test_ehlo function will automatically call and return a smtplib instance to use in the test function. Check out the documentation for Pytest here.
import pytest

@pytest.fixture
def smtp_connection():
  import smtplib
  return smtplib.SMTP("smtp.gmail.com", 587, timeout=5)

def test_ehlo(smtp_connection):
  response, msg = smtp_connection.ehlo()
  assert response == 250
  assert 0 # for demo purposes
When test are written, you want to make sure you are testing as much of the code as possible. Top do this, the coverage library can help generate reports on your testing code coverage. coverage allows you to generate a report on the console or if yo prefer in HTML or XML format.
Testing code also involves linting the code. A linter can analyize syntax errors, runtime errors, and coding style guidelines. The pep8 library helps to analyze code formatting. Pyflakes on the other hand, analyzes for syntax errors. The flake8 library cobines these two and adds circular detection and is what most people use today. pylint is also a good library for linting and sometimes both flake8 and pylint are used together to ensure code quality. Using coverage is staright forward coverage run -m packagename.modulename arg1 arg2 but you can view more information in the documentation.
Virtualenv
virtualenv is an important tool with similar benefits to docker: isolation. Some projects may use the same library but need different versions. Instead of deadling with this conflict of versoning, you isolate each Python project by creating a seperate Python install and library folder for each project. It sounds like a lot but you wouldn’t commit these files and you’d only install it once when ytou first create the project. You’ll first need to install virtualenv with python3 -m venv venv. This will install the new Python interpreter into the venv folder. You then activate the interpreter to use that one instead of the global one by source venv/bin/activate. You should see a (venv) at the beginning of your bash prompt. To deactivate and retyurn to the global Python installation run source venv/bin/deactivate. Once you’ve activated the local Python you can install libraries and do (almost) everything you could do in the global Python.
Documenting
Documentation is one of the most important things in maintaning a code base. Python has a dedicated library for parsing documenation called Sphinx. You can install Sphinx with pip install sphinx and in your src/ folder (read on Python project structure) create a folder named docs/. In here you run sphinx-quickstart to help you auto generate documentation for your code. Sphinx is able to read your documentation for classes and functions to create beautiful documentation web pages in various themes. Read more about Sphinx here.
That about covers everything. Of course this a brief overview of some of the tools you can use to make a professional grade Python project. With proper vurtualization, linting, documentation, testing, and debugging, deployment headaches involved in large scale projects with large teams can be automated and minimized.